This blog is about programming your own PIC microcontroller. I had never done it before and while I was working on my own OTGW (See http://www.b00z.nl/blog/2016/04/my-first-steps-at-home-automation-and-pcb-design-otgw-led-panel-design-with-eagle-software/) I had to program it myself. Sure they offer links to people who can send you preprogrammed PIC’s, but what’s the fun of that? ;o)
First I needed some hardware. All items were ordered through AliExpress:
The PIC itself : PIC16F88-I/P
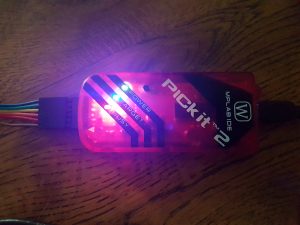
The programmer: PICKIT2 Programmer + PIC Programming Adapter
And, for this project, the OTGW firmware: download latest (gateway.hex) from http://otgw.tclcode.com/download.html#hexfiles
There are may utils that can programm PICs with eg. the pickit, however for just programming the hex I found that Linux is still the fastest way to go. At least for me.
So first you’ll install all necessary software (I’m using an Ubuntu distro):
pk2cmd
pk2cmd source: https://sourceforge.net/projects/pk2cmdv1-20-linux/
Direct Download: https://sourceforge.net/code-snapshots/svn/p/pk/pk2cmdv1-20-linux/code/pk2cmdv1-20-linux-code-3-trunk.zip
Or checkout by SVN: svn checkout svn://svn.code.sf.net/p/pk2cmdv1-20-linux/code/trunk pk2cmdv1-20-linux-code
First install libusb-dev:
sudo apt-get install libusb-dev
Next unpack the pk2cmd code into a directory or go into the pk2cmdv1-20-linux-code/pk2cmdv1.20LinuxMacSource/ directory if using the svn checkout.
Then build the software and install it:
onno@programhost:~/Software/picprogrammer/pk2cmd$ make linux
 make TARGET=linux
 make[1]: Entering directory '/home/onno/Software/picprogrammer/pk2cmd'
 g++ -Wall -D_GNU_SOURCE -O2 -I/usr/local/include -DLINUX -DUSE_DETACH -DCLAIM_USB -o cmd_app.o  -c cmd_app.cpp
 (..SNIP..)
 pk2usbcommon.o pk2usb.o P24F_PE.o dsP33_PE.o strnatcmp.o -L/usr/local/lib -lusb
 make[1]: Leaving directory '/home/onno/Software/picprogrammer/pk2cmd/pk2cmdv1-20-linux-code-3-trunk/pk2cmdv1.20LinuxMacSource'

onno@programhost:~/Software/picprogrammer/pk2cmd$ sudo make install
 mkdir -p /usr/share/pk2
 cp pk2cmd /usr/local/bin
 chmod u+s /usr/local/bin/pk2cmd
 cp PK2DeviceFile.dat /usr/share/pk2/PK2DeviceFile.dat
When all finished, temporarily add the pk2 directory to your PATH var:
onno@programhost:~/Software/picprogrammer$ PATH=$PATH:/usr/share/pk2/
 onno@programhost:~/Software/picprogrammer$ export PATH
Now you should be able to run the following commands:
onno@programhost:~/Software/picprogrammer$ pk2cmd -?v

Executable Version:    1.20.00
 Device File Version:   1.55.00
 OS Firmware Version:   2.32.00

Operation Succeeded
If you haven’t connected your picit hardware, the result of the -?v command will be:
onno@programhost:~/Software/picprogrammer$ sudo pk2cmd -?v

Executable Version:    1.20.00
 Device File Version:   not found
 OS Firmware Version:   PICkit 2 not found
To display the help:
onno@programhost:~/Software/picprogrammer$ sudo pk2cmd -?
 PICkit 2 COMMAND LINE HELP
 Options              Description                              Default
 ----------------------------------------------------------------------------
 A<value>             Set Vdd voltage                          Device Specific
 B<path>              Specify the path to PK2DeviceFile.dat    Searches PATH
 and calling dir
 C                    Blank Check Device                       No Blank Check
 D<file>              OS Download                              None
 E                    Erase Flash Device                       Do Not Erase
 F<file>              Hex File Selection                       None
 G<Type><range/path>  Read functions                           None
 Type F: = read into hex file,
 path = full file path,
 range is not used
 Types P,E,I,C: = ouput read of Program,
 EEPROM, ID and/or Configuration
 Memory to the screen. P and E
 must be followed by an address
 range in the form of x-y where
 x is the start address and y is
 the end address both in hex,
 path is not used
 (Serial EEPROM memory is 'P')
 H<value>             Delay before Exit                        Exit immediately
 K = Wait on keypress before exit
 1 to 9 = Wait <value> seconds
 before exit
 I                    Display Device ID & silicon revision     Do Not Display
 J<newlines>          Display operation percent complete       Rotating slash
 N = Each update on newline
 K                    Display Hex File Checksum                Do Not Display
 L<rate>              Set programming speed                    Fastest
 <rate> is a value of 1-16, with 1 being
 the fastest.
 M<memory region>     Program Device                           Do Not Program
 memory regions:
 P = Program memory
 E = EEPROM
 I = ID memory
 C = Configuration memory
 If no region is entered, the entire
 device will be erased & programmed.
 If a region is entered, no erase
 is performed and only the given
 region is programmed.
 All programmed regions are verified.
 (serial EEPROM memory is 'P')
 N<string>            Assign Unit ID string to first found     None
 PICkit 2 unit.  String is limited to 14
 characters maximum.  May not be used
 with other options.
 Example: -NLab1B
 P<part>              Part Selection. Example: -PPIC16f887     (Required)
 P                    Auto-Detect in all detectable families
 PF                   List auto-detectable part families
 PF<id>               Auto-Detect only within the given part
 family, using the ID listed with -PF
 Example: -PF2
 Q                    Disable PE for PIC24/dsPIC33 devices     Use PE
 R                    Release /MCLR after operations           Assert /MCLR
 S<string/#>          Use the PICkit 2 with the given Unit ID  First found unit
 string.  Useful when multiple PICkit 2
 units are connected.
 Example: -SLab1B
 If no <string> is entered, then the
 Unit IDs of all connected units will be
 displayed.  In this case, all other
 options are ignored. -S# will list units
 with their firmware versions.
 See help -s? for more info.
 T                    Power Target after operations            Vdd off
 U<value>             Program OSCCAL memory, where:            Do Not Program
 <value> is a hexadecimal number
 representing the OSCCAL value to be
 programmed. This may only be used in
 conjunction with a programming
 operation.
 V<value>             Vpp override                             Device Specific
 W                    Externally power target                  Power from Pk2
 X                    Use VPP first Program Entry Method       VDD first
 Y<memory region>     Verify Device                            Do Not Verify
 P = Program memory
 E = EEPROM
 I = ID memory
 C = Configuration memory
 If no region is entered, the entire
 device will be verified.
 (Serial EEPROM memory is 'P')
 Z                    Preserve EEData on Program               Do Not Preserve
 ?                    Help Screen                              Not Shown

Each option must be immediately preceeded by a switch, Which can
 be either a dash <-> or a slash </> and options must be separated
 by a single space.

Example:   PK2CMD /PPIC16F887 /Fc:\mycode /M
 or
 PK2CMD -PPIC16F887 -Fc:\mycode -M

Any option immediately followed by a question mark will invoke
 a more detailed description of how to use that option.

Commands and their parameters are not case sensitive. Commands will
 be processed according to command order of precedence, not the order
 in which they appear on the command line.
 Precedence:
 -?      (first)
 -B
 -S
 -D
 -N
 -P
 -A -F -J -L -Q -V -W -X -Z
 -C
 -U
 -E
 -M
 -Y
 -G
 -I -K
 -R -T
 -H      (last)

The program will return an exit code upon completion which will
 indicate either successful completion, or describe the reason for
 failure. To view the list of exit codes and their descriptions,
 type -?E on the command line.

type -?V on the command line for version information.

type -?L on the command line for license information.

type -?P on the command line for a listing of supported devices.
 type -?P<string> to search for and display a list of supported devices
 beginning with <string>.

Special thanks to the following individuals for their critical
 contributions to the development of this software:
 Jeff Post, Xiaofan Chen, and Shigenobu Kimura

Operation Succeeded
Even though you’ve updated your PATH var, it still might complain it can’t find the PK2DeviceFile.dat file:
onno@programhost:~/Software/picprogrammer$ sudo pk2cmd -P
 PK2DeviceFile.dat device file not found.
Therefore I always use the -B option:
onno@programhost:~/Software/picprogrammer$ sudo pk2cmd -B/usr/share/pk2/ -P
 Auto-Detect: No known part found.
It seems the programmer can’t recognize the PIC. This might be because it’s not one of the ‘default’ type (see listing further down), or maybe you haven’t connected it the right way to the device. One indication of the PIC not being correctly connected to the programmer is with the following output:
onno@programhost:~/Software/picprogrammer$ sudo pk2cmd -B/usr/share/pk2/ -P
 Auto-Detect: No known part found.

VDD Error detected.  Check target for proper connectivity.
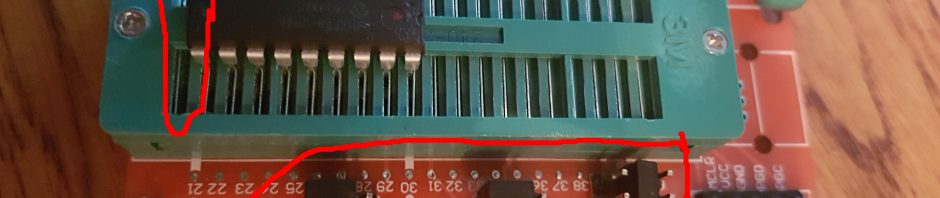
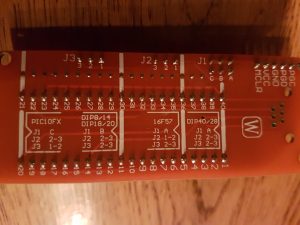
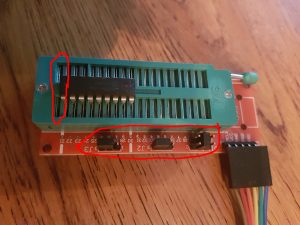
I bought my programmer including an adapter. Which had several options for different PICs. I ended up using a multimeter with the Continuity setting (howto: https://learn.sparkfun.com/tutorials/how-to-use-a-multimeter/continuity) to verify the right pins are connected to the right input pins. As you see below my adapter has three jumpers with different settings for different PIC’s. In my case it turned out (using the multimeter) that I had to move my PIC one place up for the pins to line up correctly.
Another way, like when you don’t have an adapter, is to directly connect the pins of the PIC to the right pins of the programmer using jumper wires.
To get a list of supported PIC’s, run:
onno@programhost:~/Software/picprogrammer$ sudo pk2cmd -B/usr/share/pk2/ -PF

Auto-Detectable Part Families:

ID#  Family
 0   Midrange/Standard
 1   Midrange/1.8V Min
 2   PIC18F
 3   PIC18F_J_
 4   PIC18F_K_
 5   PIC24
 6   dsPIC33
 7   dsPIC30
 8   dsPIC30 SMPS
 9   PIC32

Operation Succeeded
When all is setup correctly, and you’re using a PIC16F88P, it should auto detect the PIC, the indicator LED’s on the programmer will flash:
onno@programhost:~/Software/picprogrammer$ sudo pk2cmd -B/usr/share/pk2/ -P
 Auto-Detect: Found part PIC16F88.

Operation Succeeded
To get the best results, first you erase your PIC memory:
onno@programhost:~/Software/picprogrammer$ sudo pk2cmd -B/usr/share/pk2/ -PPIC16F88 -X -E
 Erasing Device...

Operation Succeeded
And then program it, in this case with the gateway.hex:
onno@programhost:~/Software/picprogrammer$ sudo pk2cmd -B/usr/share/pk2/ -PPIC16F88 -M -Fgateway.hex
 PICkit 2 Program Report
 29-10-2016, 18:03:09
 Device Type: PIC16F88

Program Succeeded.

Operation Succeeded
After programming, always double check it loaded correctly:
onno@programhost:~/Software/picprogrammer$ sudo pk2cmd -B/usr/share/pk2/ -PPIC16F88 -Y -Fgateway.hex
 PICkit 2 Verify Report
 29-10-2016, 18:03:40
 Device Type: PIC16F88

Verify Succeeded.

Operation Succeeded
If the programmed code doesn’t match the hex file, you’ll get:
onno@programhost:~/Software/picprogrammer$ sudo pk2cmd -B/usr/share/pk2/ -PPIC16F88 -Y -Fgateway.hex
 PICkit 2 Verify Report
 29-10-2016, 17:59:39
 Device Type: PIC16F88

Program Memory Errors

Address   Good     Bad
 000000    00158A   003FFF
Well, that are the basics from my point of view. I hope you found this post useful.
– Onno.